Sunday, July 8, 2012

cooking from the garden

Wow, it's been a few weeks since I've posted anything!  My garden has been growing a lot in the past few weeks and I'm really excited about this update - I FINALLY get to start cooking from my very own garden.  There is really something special about growing your own food and then eating it.

Here is a picture of today's harvest:

About 2 pounds of green beans and one good sized zucchini! 
What am I going to do with all these fresh veggies?!  With the zucchini, I am going to make chocolate chip zucchini bread.  I love this bread; it is great for breakfast or a snack and is also very good for you.  

I will probably just end up blanching most of the green beans and eating them that way.  Green beans are my favorite vegetable, and I would love to grow them again next year.  Today, I harvested some of the green bean seeds for next year.  Harvesting your own seeds is a great money saver! 

Harvesting seeds!
To harvest green bean seeds, just split the bean in half, being careful not to damage the seeds.  Remove the seeds and set on a paper towel to dry.  Once dry, store in an air tight bag or container.  Remember to label your seeds!

Since green beans are my favorite vegetable, I want to preserve some of them to have in the fall and winter.  I've been canning for a few years now, but I have never canned green beans.  I did a little research and everything I found said that pressure cooker canning is the best method for canning green beans.  I don't have a pressure cooker, so I just hot water bath canned them.  I put a little salt and a garlic clove in the can.  This time I just did one can to see how it would turn out.  My hot water bath canning seemed to work well, but I cannot recommend it because it is not approved by the USDA.

my test run for canning green beans.
next time I will try and pack more beans in the can.


The pants in my garden are growing very nicely.  Here is an update in pictures: 

Sunflowers are blooming!  My favorite! 

green beans are doing very well!
 I will be canning a lot more, there is no way I can eat them all now.

Baby cucumber starting to grow

lots of tomatoes!  can't wait for these to get ripe 

green peppers are starting to grow! 


Saturday, June 2, 2012

Growing Season

Lots of exciting things happening in the garden this week!  We have had a TON of rain this week, but today has been sunny, mid 70's, and no humidity.  And the garden is loving it.  
Most of the plants seem to be growing well.  One of the tomato plants is doing better than the other.  The zucchini plant has about doubled in size.  Peppers and peas are looking great as well.  

Tomato Plant

Pepper Plants

Zucchini Plant 


I also added a little decoration to the garden.  I went to The Pottery Works in Lancaster, PA.  TPW is a paint your own pottery pottery studio.  They have tons of pottery that you can paint in any design or color that you want.  I painted a little gnome for the garden.  


He fits in very well, don't you think?


Sunday, May 20, 2012

Garden Update!


My backyard garden has had its ups and down over the past few weeks.
The green bean seeds sprouted and are growing nicely; they are about 4 inches tall today.  The sunflower seeds have also sprouted.  I planted started plants for green peppers, tomatoes and zucchini; those have responded nicely and continue to grow.
little green bean plants

The cucumber seeds did not do anything; I believe they died.  BUT.... yesterday I was at my mom's house and we went on a walk in the neighborhood.  One of my mom's neighbors was selling cucumber starter plants for $1 a plant!  The neighbor said that she had way too many to fit in her garden so she was selling the extras.  I picked up a few healthy cucumber plants!  
I planted carrot seeds and I think they started to sprout; there are little green grass like leaves where I planted the carrot seeds.  


I also made some more improvement to the garden: I bought a small fence to go around the garden.  I don't want the bunnies to be able to eat my veggies.  I live in a suburban neighborhood, so I don't have to worry about larger animals getting in my garden.  So I bought a fence that's about a foot and a half tall.  Home improvement stores and Wal Mart sell these kinds of fences.  You just stick them in the ground.  I also put tomato cages around my tomato plants.  I'm not really sure what the tomato cages do, but I know it's important!  

garden plot with new fence!  This plot has green beans, cucumbers,  zucchini, and maybe carrots! 

This plot has green pepper plants and tomato plants.  It's kinda hard to see the tomato cages in the picture, but I
promise they are there! 

The biggest thing that I have learned so far with my garden is that it is VERY important to water the plants a TON!  If it is not raining, you MUST water you plants!!!!  I normally water first thing in the morning and then again in the evening.  That seems to be working for now.  

I have come to really enjoy my garden.  It gives me something to do and I have a good excuse to be outside.  I'm looking forward to when my veggies come in!  I can't wait to cook with the food I grew in my own back yard!


Tuesday, May 15, 2012

Slow Cooker Pork Dinner

I decided to go to yoga for the first time in a long time(too long a time).  My yoga class was from 5:30p-6:45p, right over dinner time.  So I decided to throw something in the slow cooker to have ready for dinner when I got home.  I had some pork, potatoes, and carrots and made up a great dinner.  I was inspired by a roasted potato recipe that I made a while back.

Ingredients:
Pork, whatever cut you like, however much you want to make
2 cups new potatoes, cut in half
1 cup carrots, cut into bite size pieces
4 tablespoons red wine vinegar 
4 tablespoons dijon mustard
2 tablespoons olive oil 
2 tablespoons chopped fresh rosemary 
salt and pepper to taste

Start Cooking:
1.  In a small bowl, mix together the vinegar, mustard, olive oil, rosemary, salt and pepper. 
2.  Put everything in the slow cooker and cook on high for about 2 and a half hours.  Or on low for twice the time.  


Tips and Hints:
1.  I made extra to use for lunches and for the rest of the week.  
2.  This also freezes really well.  


Enjoy!

Sunday, May 13, 2012

Mother's Day in the kitchen

My little sister just got home from college yesterday.  Hannah goes to a college located in the mountains of North Carolina.  She loves it there, but it's a long way away from south central PA.  It worked out great that Hannah could be home for mother's day this year.  We bought our mom and new stereo for her gift; her old one was on it's last leg.  Our mom isn't really into "things."  She likes experiences more than material things.  So we decided to spend the day in the kitchen together.  We made a whole bunch of stuff, but I would like to share one of our favorites: fresh guacamole.  

Ingredients:

2 avocados 
1 tomato, diced 
juice of 1 lime
green onions, thinly sliced 
cilantro, chopped
salt, to taste 

Start Cooking:

1.  Cut the avocados out of their skin and place in a medium bowl.  


2. Use a fork to mash up the avocado.  You can make it smooth or chunky, it's up to you. 


3.  Mix in the rest of the ingredients.  It's really up to you how much green onions and cilantro you want to add.  I suggest starting with a little bit, tasting, then adding more if needed.  


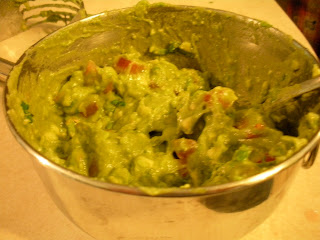
finished guacamole! 

Tips and Hints:
1.  Store in the fridge, in an air tight container.  Guacamole will last a few days this way, if you don't eat it all first. 
2.  Serve with corn chips, nachos, tacos...  

Enjoy!


Monday, May 7, 2012

chocolate chip banana muffins

Chocolate makes everything better!  A statement that I always believe to be true.  When my sister and I were little, our mom would put chocolate chips in healthy foods to get us to eat them.  It worked!  And I'm sure it will work for other picky kids, and some picky adults too!  I still put chocolate chips in many different recipes.
My mom has been making these chocolate chip banana muffins for as long as I can remember.  We are not sure where the original recipe came from; what I am going to post is mom's adaptation to some unknown original recipe.  

Ingredients: 
1 egg
3/4 cup packed brown sugar
1 1/3 cups mashed bananas.  use a fork to mash the bananas.
1/2 cup chocolate chips.  You can also substitute chopped nuts or raisins, but who would want to do that?
1/3 cup veggie oil
1 teaspoon vanilla 
3/4 cup white flour
3/4 cup whole wheat flour
1/2 cup wheat bran 
2 teaspoons baking powder
1/2 teaspoon baking soda
1 teaspoon cinnamon 
1/4 teaspoon salt

Start Cooking: 
1.  Pre heat oven to 375 degrees.  Grease 12 regular size muffin tins
2.  In a medium bowl mix together egg and sugar.  Then add bananas, oil, and vanilla.  Mix well.
wet ingredients

3.  In a large bowl, mix remaining ingredients(dry ingredients).  
dry ingredients

4.  Pour banana mixture into the dry ingredients and gently fold.  DO NOT over mix!!!  If you over mix, your muffins will be tough, dry, and chewy(eew!).  
wet and dry mixed together
5.  Spoon the batter into the greased muffin tins.  Bake for 15-20 minutes.  Mine normally take about 18 minutes.  Muffins will be golden brown when done.
6.  Let cool for a few minutes in the muffin tin, then turn out onto a cooling rack to finish cooling.  

finished muffins!

Tips and Hints:
1.  DO NOT over mix the batter!!! I know I said it before, but this is the key to good muffins!  
2.  Can't eat them all before they go bad?  These muffins freeze really well.  Cool completely, then freeze.  Thaw out when you are ready to enjoy! 

Enjoy!


Saturday, May 5, 2012

Gardening Adventure!

As some of you know, I moved into a great new house this January 2012.  Along with my great house, I got a nice back yard, with lots of open space.  I then got the brilliant idea of planting a veggie garden this year.  After some planning, and looking into all the details, I felt a little overwhelmed with everything.  But I thought, what the heck, I've made it through worse!  So started my gardening adventure!   

This morning, I spent two and a half hours working in my yard; weeding the garden bed, edging it with rocks, finding old boards to make walking paths with, and a brief run in with poison ivy(oops!), and finally planting some seeds.  So far I have planted green beans, cucumbers, carrots, and a few kinds of sunflowers, all from seeds.  Lets hope they make it!  

My garden, as of today
And this is what I have to show for 2.5 hours of work!  Doesn't look like much yet, let's hope it starts looking like something worthwhile soon!  I bought some tomato and sweet pepper starter plants that I will be adding to the garden in a few weeks.  

I hope to cook a lot from my garden.  No farms, no food, right?  Can the same be said for backyard garden plots?  I also hope to buy and cook locally and in season this summer.  Stay tuned for more garden adventure updates and local/in season cooking posts!
   

Sunday, April 15, 2012

Fresh Salsa!

I love fresh salsa in the spring and summer, one of my favorite snacks.  And my favorite thing about it: you can make it just the way you like it.
Here is my recipe for my favorite fresh salsa:

Ingredients: 
tomatoes, whatever kind looks freshest at the market or grocery store
red onion
limes
black beans, canned
avocado
fresh cilantro

Start Cooking:
1.  Chop the tomatoes into small pieces.  Chop the onion into very small pieces.  Chop the avocado into small pieces, about the same size as the tomatoes.  Finely chop a handful of fresh cilantro.  Put all of this into a bowl with a lid.
2.  Drain and rinse the can of black beans.  Add about half of them to the salsa mix.
3.  Juice the lime directly into the salsa mix.
4.  Gently mix everything together with a spoon.


Tips and hints:
1.  Store in an air tight container in the fridge, will last a few days, if you don't eat it all first! 
2.  I like mild salsa.  If you like hot salsa, add some chopped up hot peppers to your salsa.  
3.  Fresh is best!  Shop local if you can.  If the ingredients don't look fresh at the store/market, wait until they get new produce in and buy then.  Your salsa will taste much better with fresh ingredients!  

Enjoy!

Tuesday, April 10, 2012

Green Beans

My entire family always gets together for Easter at someone's house, my mom's, my grandparents, my Aunt and Uncle's house.  This year we all met at my Aunt and Uncle's house and we were each asked to bring a dish and I was asked to bring a veggie dish.  I didn't want want to do the regular green bean casserole.  I think they are kind of mushy and boring.  I hate mushy green beans.  So I came up with a new recipe.  

Green Beans with Tomatoes and Garlic 

Ingredients: 
fresh green beans
cherry or grape tomatoes, whatever looks freshest in the store
fresh garlic
olive oil
salt and pepper to taste

Basic fresh ingredients 

Start Cooking: 
1.  Snap the stem end off of the green beans.  Cut the tomatoes in half or in quarters, depending on how big you want them.  Mince up some garlic, it's up to you how "garlicey" you want your dish.  
2.  Put everything in a large pan, along with some olive oil.  You just want enough olive oil to coat the beans.  You do not want the beans to be swimming in the oil.  Saute until the green beans are tender.  Add salt and pepper to taste.  

Finished Beans!  

Only about half of my green beans were eaten at the dinner.  I made a TON and there were also a few other veggie dishes.  I loved them and my Aunt loved them.  I like my green beans more on the crunchy side, some people like them more tender.  If you are making this for a large group, I would go more on the tender side.  

Enjoy!  

Tuesday, March 13, 2012

American Chop Sui

This recipe was started by my grandmother, passed on to my mom, and then passed on to my sister and me.  I honestly have no idea where the name came from, I'm sure my grandparents came up with it for some silly reason.  I've grown up eating this dish.  It is very kid friendly, easy to make, freezes well, and is a complete meal in one pot.

Ingredients: 
1/2 pound ground turkey or ground beef
1/2 box of elbow pasta(or shells, any small pasta will do)
1/2 yellow onion, finely chopped
1 green bell pepper, chopped
1 1/2 cups frozen mixed veggies, of whatever other variety you like
1 can tomato sauce
Italian seasoning to taste

Start Cooking:
1.  Cook the pasta per the directions on the box.  While the pasta is cooking, saute the onions and ground meat in a large pan.  After a few minutes, add the green peppers.

2.  Continue cooking for about 5 more minutes, then pour half the tomato sauce into the pan and add the seasonings.  


3.  Once the pasta is done cooking, drain and add to the meat mixture.  Add the frozen veggies.  Stir so everything is incorporated.  Continue cooking for a few more minutes so the veggies become warm. 

4. Serve with bread and grated cheese.  

Tips and Hints:
1.  Use whole grain pasta for extra fiber.  You won't taste any difference and it's a good way to get kids to eat more whole grain. 
2.  Make a double batch and freeze for later.  
3.  This recipe is really easy to tailor to your own taste; use whatever seasonings, meats, veggies you like. 

Enjoy!


Saturday, February 25, 2012

Healthy(er) Pasta Bake

Sorry for the lack of posts!  I will be posting more often in the coming weeks.

I have had some health concerns recently, mainly trouble regulating my blood sugar(it's too low, then spikes, then drops way too low again) and migraines.  So I have decided to eat small amounts of meat and change my diet.  Whole grain foods are best for keeping and maintaining a steady blood sugar level.
I LOVE pasta and eat it a few times each week.  My challenge was to make a dish using whole grain pasta.  I generally don't like the texture of whole grain pasta, it's sort of chewy/gritty.  But I thought I would give it another try and I came up with a pasta bake using whole grain pasta and ground turkey.  I'm sure it's been done many times before, but the turkey(instead of beef) and the whole grain pasta(instead of white pasta) make this dish a little healthier.

Ingredients: 
1/2 box whole grain noodles, I used small shells, but you can use any style you like
1/2 pound ground turkey
2 cups grated cheese, whichever kind you like
1 cup tomato sauce

Start Cooking:
1.  Pre heat oven to 375 degrees.  In a medium pot, cook pasta until just underdone.  It will finish cooking while baking and you don't want the pasta to get soggy.
2.  While the pasta is cooking, grease a 8X8 or 9X9 baking dish with cooking spray.  Put the ground turkey in the dish and break up with a fork or use your fingers.  Sprinkle the cheese on top.
3.  Once the pasta is done cooking, drain and add to the baking dish.  Pour sauce over the pasta and mix well.  Then top with a little extra cheese.
Pasta bake, before baking
4.  Bake for about 45 minutes, until the cheese is golden on top.  Let sit for 10-15 minutes before serving.  Serve with your favorite bread and veggie of choice.  
Pasta bake, after baking

Tips and Hints:
1.  This dish freezes really well.  Pop it in the freezer before baking.  The night you want to cook it, just bake as normal(might take a little longer if still frozen when you put it in the oven).  

Enjoy!  

Saturday, January 28, 2012

Hispanic Chicken and Rice

My grandmother is Puerto Rican.  She was born here in the US, but her father was born in Puerto Rico and then moved to NYC as a young adult.  My great grandfather, who I never met, made a traditional chicken and rice dish ever Christmas eve.  He learned the recipe from his father, and then it got passed down to my grandmother.  Aroz con pollo, that Christmas eve meal, has been one of my favorites for as long as I can remember.  My mom, sister and I made aroz con pollo this year.  It take a few hours to make and is a lot of work.  I love the dish, and wanted to make an easier, faster version of it.  Ok, so mine isn't as good as the real thing.  But it's a nice week night dinner.

Ingredients: 
Spanish yellow rice mix, found in the hispanic foods section of the grocery store
Chicken, I used 2 chicken thighs because they were on sale
Salsa to taste
1 can of peas

Start Cooking:
1.  Pre heat oven to 350 degrees.  Put the chicken in a baking dish and cover with 1/4-1/2 cup of your favorite salsa.  Bake for an hour.
2.  While the chicken is baking, make the rice according to the directions on the box.
3.  Once the chicken is cooked, let sit for about 20 minutes so it can cool off.  Pick all the chicken off the bones, and make into bite size pieces.  Add the chicken to the rice, along with the salsa that was baked with the chicken.  If you like, add extra salsa.
4.  Drain and rinse the canned peas and stir into the rice and chicken.

finished rice and chicken, minus the peas(I didn't have any on hand)


Enjoy! 

Saturday, January 7, 2012

Easy, Healthy Breakfast

I've always had a hard time with healthy, nutritious breakfasts that will give me energy to start my day.  I can make that happen, but I do not have time to cook a big breakfast every morning.  So I was browsing around for some ideas and morphed what I found into my own version of egg and  biscuit cups.  I made a batch of 6 cups, froze 3 and put 3 in the fridge.  I can then heat them up in the morning before work and have a high protein, high energy breakfast.

Ingredients: 
6 biscuits from the fridge section in the tube
6 eggs
milk
cheese
season salt to taste
1/4 cup onion, finely chopped
1/4 cup bell pepper finely chopped

Start Cooking: 

1.  Saute the onion and pepper in a small skillet, until tender and slightly browned.  Remove from heat to cool.  Meanwhile, pre heat the over to 350 degrees.
2.  Spray 6 jumbo muffin tins with cooking spray.  Flatten out the biscuits into the bottom of the muffin time.  

3.  Crack the eggs into a large bowl and beat with a few tablespoons of milk and the season salt to taste.  If you do not like season salt, use regular salt to taste.  Mix in the cheese, however much you like.  Then mix in the cooled veggies.  

4.  Pour the egg mixture into the muffin cups, making sure there is an even amount in each cup.  

5.  Bake for about 20 minutes, until the eggs are set and starting to brown.  Also check to make sure the biscuit is cooked through on the bottom.  Transfer to a cooling rack and cool completely before storing.  

Tips and Hints:
1.  You can easily add meat to the egg mixture.  Just make sure the meat is cooked all the way through before adding it to the eggs.  
2.  Serve with fruit for a complete breakfast.  
3.  Use whatever veggies you have on hand.  Onions and bell peppers are a good starting point, but if there are others you like, use them.  

Enjoy!